“The template looks just like your typical HTML document, not like JSX in React. How does Vue use their Virtual DOM internally?”
At this point, you probably have a good understanding of the ease of use that Vue provides to us. That being said, the internal processes that make Vue so easy to use externally are much more complex internally. As a front end developer, it is extremely important to understand the rendering process because it helps to solve problems when you are faced with those tediously annoying bugs. Understanding the rendering process will also go a long ways in optimizing the performance of your application.
In today’s blog post, we will answer questions about the DOM, Virtual Dom, and rendering process questions.
What is Virtual DOM In General?
A few years ago, React captures the excitement of many by introducing and streamlining this idea of a Virtual Dom. Nowadays, however, many other libraries(includeing Vue 2.0) implement the idea of a Virtual Dom. Why has it caught on so well? The reason…great performance.
In general, a Virtual Dom is just simply a JavaScript object which represents the Document Object Model(DOM). Your application will update the Virtual DOM and never actually has to update the DOM directly. Most javaScript libraries update the DOM by implementing changes on the Virtual Dom.
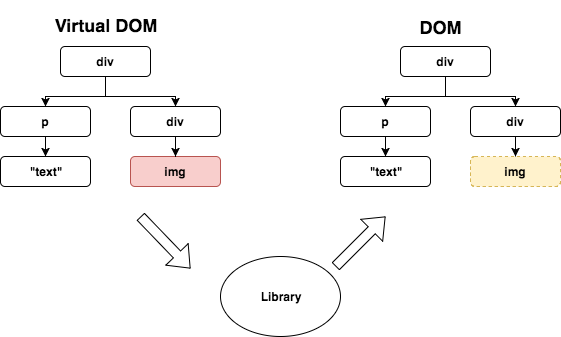
The Virtual DOM minimizes the updating cost of the real DOM. As you know, updating the real DOM is computationally expensive. The real DOM is rendered immediately on your browser when you update it.
Let’s imagine that when you are trying to implement a table which has a next button with just DOM. What happens when you click the next button?
- All elements from the table are removed, then this change is rendered into the DOM
- New element ares added to the table and these changes are rendered to the DOM
If you decide to directly change the real DOM then these two steps have to be completed. This is inefficient because it’s rendered even in the first step — which is unnecessary.
That being said, this is an extremely straightforward approach when considering implementation option.
We also have to consider another problem when updating the DOM directly. What if the next page has the exact same data as the prior? In this case, it doesn’t have to be re-rendered. The Virtual DOM solves these 2 problems utilizing two of its primary features.
The first feature that a Virtual DOM offers you is the ability to control the timing at which the Virtual DOM is rendered. The real DOM will completely re-render the same data while a Virtual DOM will just maintain the state of the data without re-rendering the data if you choose to not reload the Virtual DOM. So, in the example above, you don’t have to re-render the DOM if the data on the pages is the exact same.
The second feature allows you to optimize your web applications performance by minimizing the number of times that the DOM has to be updated. Vue’s virtual DOM allows you to minimize the number of times you must update the DOM.
There is still one more huge advantage that utilizing a virtual DOM offers. Let’s take our previous example, but let’s make one minor change. What if all of the data from page one and page two are the same with the exception of a single element? Do you still have to re-render the entire DOM? The answer is no. The Virtual DOM has a function to find out which element has to be updated so that we don’t have to update the entire DOM.
If you choose to utilize a library that implements a Virtual DOM, then you can also create beautiful code externally while also optimizing the performance of your application internally.
Your HTML template is compiled into Virtual DOM
With Vue 2.0, everything works within the Virtual DOM. Even the HTML you write into your Vue component template will be compiled into the Virtual DOM when the component is rendered. In fact, Vue has a compiler API that compiles your HTML code into the Virtual DOM automatically.
> var res = Vue.compile('<div><span>{{ msg }}</span></div>')
> res.render
ƒ anonymous() {
with(this){return _c('div',[_c('span',[_v(_s(msg))])])}
}
Your HTML template is internally compiled this way. Every time you update data in Vue, the render function is called to fetch the Virtual DOM with the latest value. In this example, msg will be replaced to the current value of the data.
Vue Components can also use what is known as a render function. When Vue components have render functions, the render functions are used instead of the Vue component. This means that you can write a function to return the Virtual DOM directly without directly writing or compiling HTML.
This render functionality is also utilized for production builds.
For example, when you generate your project utilizing vue-cli, vue-cli generates build scripts using Webpack, Babel, etc…
vue-cli automatically compiles your template into a Virtual DOM during the build process. This is in comparison to building up the DOM during running time which would be of lesser performance.
Understanding Vue’s Render Process
Now, you have a pretty good understanding of what a Virtual DOM is and the purpose in which it serves. That being said, Vue has a long process before the DOM is rendered with the Virtual DOM. In the next section of this article I will explain how the following four primary processes(defineProperty, Watch, Queue, and nextTick) work in Vue internally. Overview of Vue’s internal process
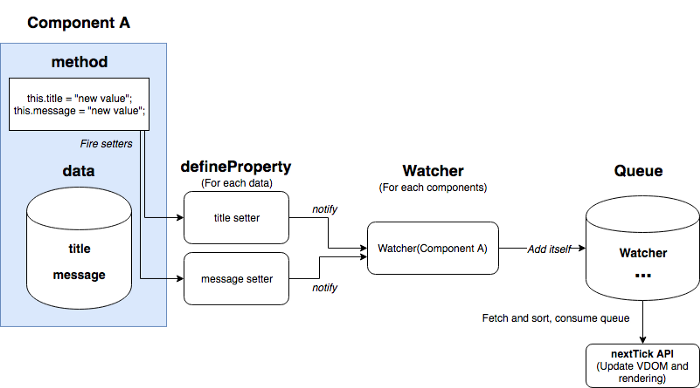
First of all, Vue uses defineProperty to define the getter and setter for each data element within your component. Every time you update the data in your method, defineProperty is being called. For example, let’s open your Chrome or Firefox’s debugger console, and type the following:
> var obj = {};
> Object.defineProperty(obj, "text", {
   get: function() {
     return text + "get";
   },
   set: function (newText) {
     text = newText + "set";
   }
  });
> obj.text = "text";
"text"
> obj.text
"textsetget"
In this code the set function is called when you update the obj.text property. This means that it stores textset as the property. If we use the same logic when reading the “obj.txt” property, then we can see that it calls the get function. This returns “textsetget”. Vue utilizes the same mechanism for listening for data updates.
So what does Vue actually do when we call the set function? Well, it notifies the Watcher objects within the Vue Virtual DOM. A Watcher is created for each component when a Vue application is initialized. The role of a Watcher is to update the Virtual DOM and the actual DOM. However, a Watcher doesn’t update each of the DOM’s immediately after it is notified.
When Watchers are notified by the setter functions, the given Watcher will add itself into a queue. Vue utilizes a Queue to avoid running the same Watcher multiple times.
One example we can look at is when your data has multiple properties called message and title. What if the message and the title are updated at the exact same time? The component will be updated twice which is not efficient. To avoid this inefficiency the Watcher is added into the queue and then it’s sorted by specific order when it’s consumed. An example of an order would be parent component to a child component. During this process, duplicated Watchers are also removed from Vue’s queue.
Another thing you need to remember is the nextTick API. This is a Vue function to consume and flush all Watchers within the queue. Once all watchers have been consumed and flushed, the DOM is updated in the Watcher’s run() function. The API is called by Vue automatically so that you don’t have to care about it. That being said, you still have the ability to call the run() function by yourself.
Finally comes the rendering of your Virtual DOM and Real DOM together. This takes place from within the run() function which is stored inside of each Watcher object. This function updates the DOM of the component with the Virtual DOM — ultimately combining the two and forming your really cool Vue application.
Also posted in: https://medium.com/@koheimikami/understanding-rendering-process-with-virtual-dom-in-vue-js-a6e602811782